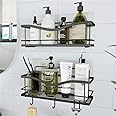
🛁 Elevate Your Shower Game—Where Style Meets Functionality!
The KINCMAX Premium Shower Caddy is a rustproof, self-adhesive organizer made from 100% 304 stainless steel. It features easy installation without drilling, a large capacity of up to 20 lbs, swift drainage for cleanliness, and includes 4 versatile hooks for added convenience.


R**S
Classy shower
I have a shower that is tile on 2 walls and glass blocks on 2 walls. These have been stuck to the tile for over a year now. No discoloration, haven't shown signs of wear. I like them because they look nicer than something hanging from the shower head or the little stand that goes in the floor.
A**N
Sturdy, attractive and a nice addition to my bath
***We’ve been using these for 3 days, I will update after a few months of use ***So, I purchased 2 sets since my husband is the diva of the family and needed 2 shelves for all of his products, lol.Caveat, I didn’t know how these would adhere to our shower tile as it isn’t flat but rather a “wavy” or uneven shower tile. See last picture and you can see how I could not get 100% of the adhesive strip to lay flat but for now, it’s working fine.The gold color is pretty, especially against the navy blue colored tile.The hooks are nice to hang any razors, rags, sponges or brushes.The design of the shelves are attractive and a nice finish.They seem sturdy and are large enough to hold large bottles of shampoos/conditioners.I did make sure to clean the tile first and wipe the tiles with rubbing alcohol to make sure everything was super clean for the adhesive to stick well.I love these shelves and I really hope they last!If the gold starts wearing off, my plan is to try some gold leaf rub and buff and see how that works but hopefully it won’t come to that.Good value for my money!Super easy to install. I did wait 24 hours per the instructions after the installation before I added my bottles of products or added weight, giving time for the adhesion to “cure or set”.So many ways you could use these shelves…not necessarily strictly for a shower as the bottom is wide enough to perhaps just to sit on your vanity or shelf to hold your items, so versatile to me.
A**
Great!
This is a really great product! I have been using these for over a year and just purchased another pack. One of the clips recently broke so I had to buy replacement adhesive. I was concerned that after a whole year it would leave a lot of residue. It came off so easy! No residue left behind on the glass!!
R**N
Durable
Definitely enhances the aesthetic of your bathroom decor easy instructions and to install holds all my face care and body care products
B**B
Looks Great
Easy to put up. I got the black, and they look great and hold plenty of products.
E**
Shower Caddy!
Have had for a while and just bought some for my daughter’s new apartment! They have started perfectly in place! Love them!
Q**Q
HOW TO REMOVE! (Because the adhesion is REAL with this product.)
I have purchased 2 sets of these, one for my shower (tile walls) and one set for my kitchen (which has a tile backsplash). I have had them installed for 2 years in my rental apartment, now I am moving and they need to be removed. They have stuck perfectly and had no issues for the last 2 years. No rust from the shower, no falling off the walls due to weight, etc.Now for the removal- there was a learning curve here. I used the images in the Amazon listing and ended up on social media watching videos. The frustration was real; the product was nearly impossible to remove. Numbers 1 & 2 were awful; heating, getting a corner up, pulling the plastic, but ALL the adhesive was left behind. I did finally get the adhesive off after hours of work and using a goo remover left to sit overnight.Day 2, prepared to suffer I moved on to the 3rd caddy; I controlled the heat better. Making sure to not get the plastic too hot. I was left with only half the glue!! :-D FINALLY, on the 4th caddy, I managed the easy removal process. I hope the below info helps you.Step 1- Remove the baskets. (I am sure you already knew to do this.)Step 2- Using a hairdryer, set it to HOT but only blow on LOW/MEDIUM. Hold the hairdryer about 7 - 8 inches back from the adhesive piece and move around the whole adhesive-- heating the glue evenly. You only need to do this for like 2-3 minutes, err on less time and work up on the time as needed. You are WARMING the glue, not melting. Melting=bad(Do NOT stay in 1 spot; keep that hairdryer moving around. You want even heating. If you get too close or stay in 1 spot plastic gets too hot and sort of softens/melts so that the plastic no longer adheres to the adhesive. When you try to pull the piece off, all the glue gets left behind.)3) Using a tool of some sort (I used the pointy corner of a 6-in-1 painter's tool) get under the glue and lift a corner edge enough that you can get a firm grip on the plastic. If the adhesive is still sticking to the plastic, that is a good sign your heat control is working!4) Repeat step 2 if needed to re-warm the adhesive. Grab the corner and pull steadily on the plastic. If the plastic is stretching as you pull it is too hot, let it cool and try again.Lastly, if you get stuck with glue left behind. Use Goo Gone and a razor blade scraper. I tried other brands (De-solve-it which claimed it could deal with industrial goo- technically with a lot of elbow grease it worked but made a mess and smelled awful.) Goo Gone worked the best and smelled massively better. Remember to let the Goo Gone sit for a bit; go have a cup of tea or something. Let the Goo Gone make your life easier.Best of luck! (Now that I know how to remove them, I do plan on using them again in my new apartment.)
R**Z
Very well made.
Beautiful shelving.
Trustpilot
3 weeks ago
2 weeks ago